Updated September 1st, 2026
Welcome to mslicer! I'll try to give a good overview of the program in this document. If you run into any bugs or just have feature requests, please don't hesitate to make an issue on GitHub or contact me directly.
Feel free to skip this section if you have already installed mslicer, but do note that not all installation methods will register file associations and create a launcher entry. Downloads are available here.
On Linux-based systems, mslicer can be downloaded as a single binary or installed through Nixpkgs or Flathub. I would recommend using the Flatpak if possible since it automatically sets up file associations (so you can double-click a .mslicer project file in your explorer to open it in mslicer) and a launcher entry.
Windows releases are distributed as plain .exe files that function as both an installer and a portable executable. The first time you run it, you will see a dialog box (screenshot below) asking if you want to install or just run. As it says in the dialog, installing will add to the Start menu and register file associations.
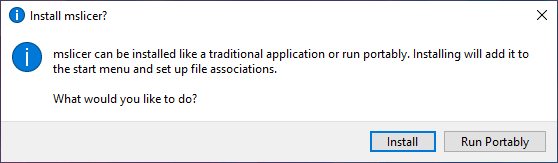
If you choose to run portably and later decide to install it, you can do so through the File › Misc › Install button.
On macOS, just download the version for your system architecture (Intel or Apple Silicon), extract the zip archive, and move the .app bundle to your Applications folder. File associations don't currently work on macOS.
The interface is made up of many panels that can be moved and reconfigured however you want. Use the View toolbar menu to hide or show specific panels or reset the layout to the default.
The most important setting to change is your printer in the Slice Config panel. You can use one of the presets if you have an Elegoo or Phrozen printer; otherwise you will need to select Custom and fill in the build volume size and LCD resolution manually (or create your own preset). If the build volume is not correct you will get inaccurate printed dimensions, and if the resolution is wrong your printer may fail to load the output without even showing an error message!
If you have a 3Dconnexion device and want to get that working in mslicer, see Spacenav.
mslicer can load .stl and .obj meshes. Add one by going to File › Import Model or drag and drop a mesh file into the workspace. Not all meshes are created equal, though; some (especially those downloaded from the internet) have issues like holes, inconsistent winding order, un-welded seams, etc., which can cause unexpected errors while slicing. If you encounter this issue or see the 'Non Manifold Mesh' warning, see Repairing Non-Manifold Meshes. For now, you can also load the built-in test model (the Utah Teapot) by pressing Ctrl+T or ⌘+T on Mac.
To move around the viewport, scroll to move towards or away from the target point, drag with left click to orbit the target point, and drag with right click to translate the target point. You can also switch between the default perspective camera and an orthographic camera in the workspace panel.
Each model in your project is listed in the Models panel. By clicking a model in the 3D view or the Models panel, you can access all its properties, including size, position, and rotation, as well as run actions like deleting the model or aligning it to the bed (see Model Properties for a complete description). The recommended way to position multiple models in a workspace is with 'Auto Layout', either quick layout, Ctrl+L (⌘+L on Mac) or with the Advanced Layout tool.
Since mslicer's automatic and manual support placement features are still under development and not usable for most models, use the method described in the Support Placement page.
For a full description of the 'Slice Config' parameters see Slice Config. The most notable one, 'Anti Aliasing', uses 3D supersampling anti-aliasing (SSAA) to pick grayscale values that more accurately represent the actual model geometry. The actual value of this setting is the number of effective samples per voxel.
Start a slice operation with the 'Slice' button on the top bar or Ctrl+R (⌘+R on Mac). Slicing shouldn't take long because (as far as I know) mslicer is the fastest MSLA slicer currently available (:p). You will then be presented with a slice preview. You can drag to pan, scroll to zoom, and scrub through the slider on the left to look through each layer.
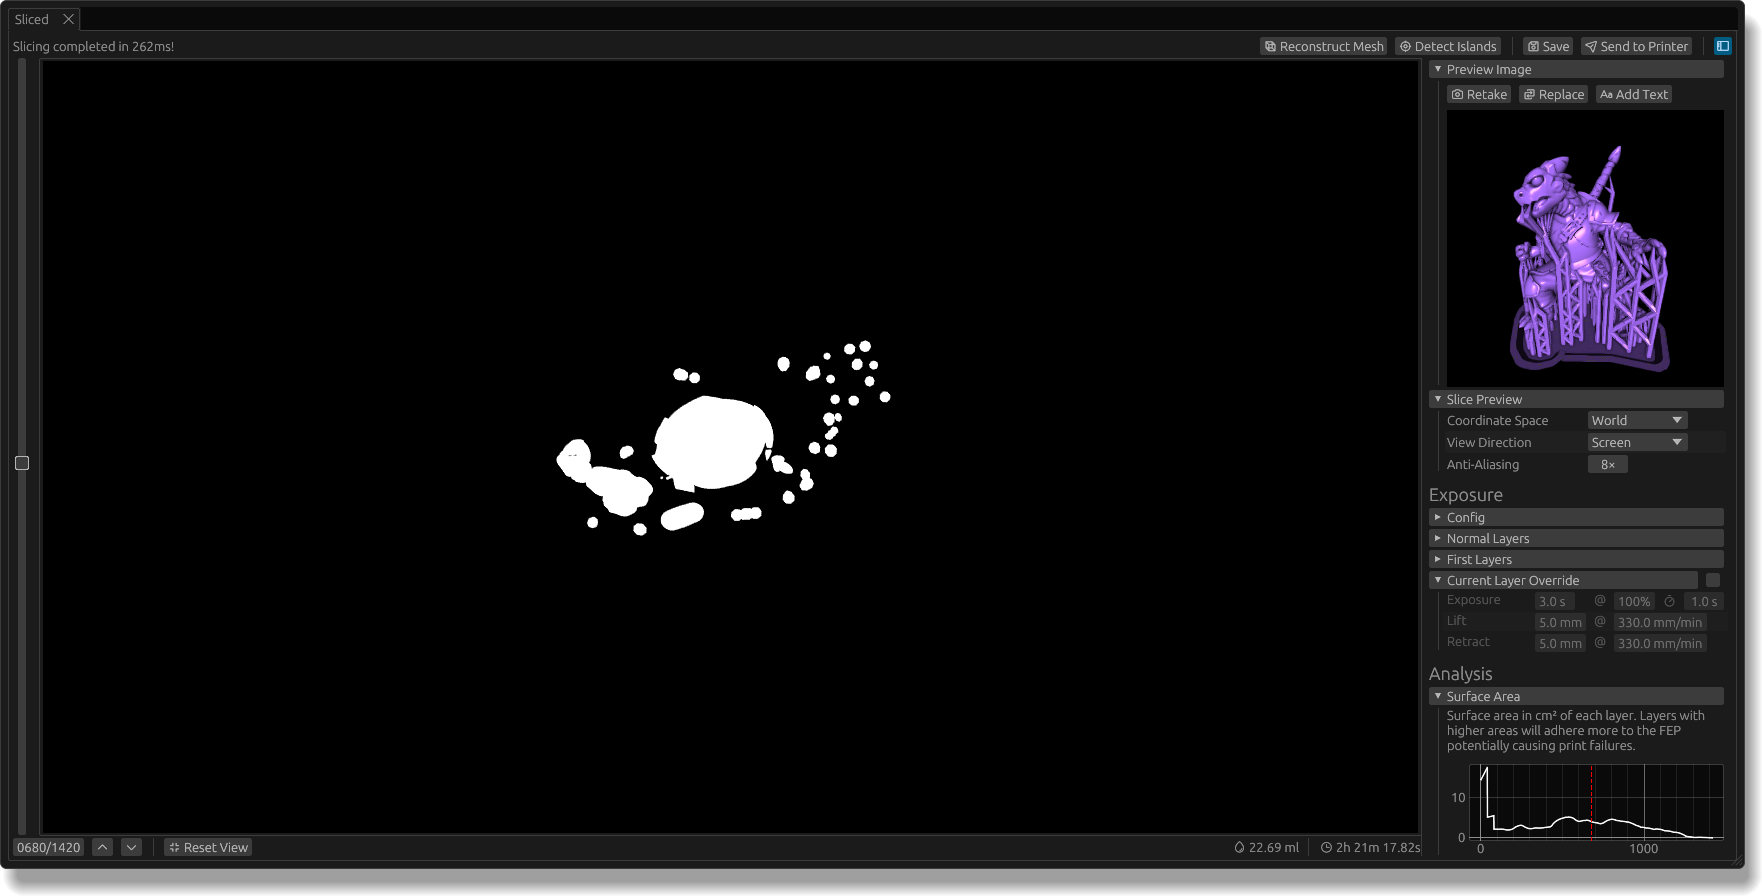
The top bar of this panel lets you save to a .goo, .ctb, or .nanodlp file, send to a printer wirelessly (see Remote Print), detect islands, or reconstruct a mesh. Islands are clusters of voxels that are not supported from below and can't be printed properly. After detecting islands, look for any red layers on the left slider and red voxels within those layers. Mesh reconstruction is intended for re-slicing a model if you only have a sliced file and don't have the original mesh.
The sidebar exposes tools for modifying and analyzing sliced files generated in mslicer or loaded from disk (File › Load Sliced, Ctrl+Shift+I, or ⌘+Shift+I on Mac):
If you are using a printer with a Chitu mainboard, you can wirelessly start and monitor prints. Specifically, those that support SDCP v1.0 and v3.0 (there is no v2 for some reason), including the Saturn 3 / 4 series.
Depending on your system, you may need to first change your firewall settings. You can either allow connections on the ports after they have been randomly picked or set and unblock default ports; check the 'Services' dropdown in the Remote Print panel. On Fedora Linux this can be done easily with sudo systemctl stop firewalld.service.
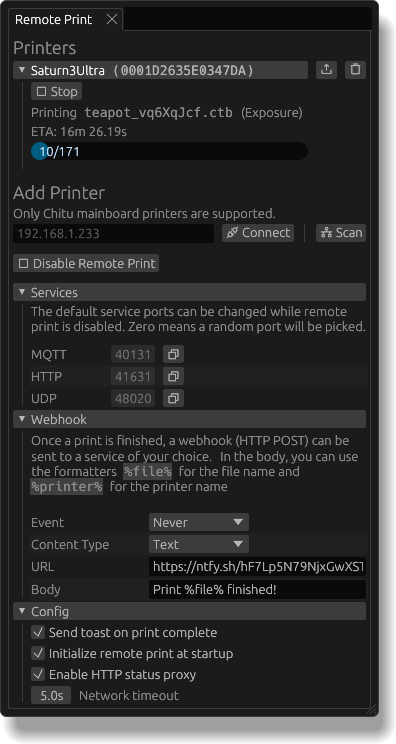
To add a printer, first click on 'Initialize' in the Remote Print panel, then either scan for printers on your network or connect to one using an IPv4 address. You will then be able to send prints from the Sliced panel or upload sliced files to the printer directly with the little upload button. You can also remotely stop and pause prints (note that pause is currently only supported on printers using the v3.0 protocol).
There are two ways you can get notified when a print finishes: desktop notifications and webhooks. Desktop notifications are the simplest to use; just check the 'Send toast on print complete' checkbox under 'Config'.
But if you want to (for example) get a push notification on your phone instead, you can use webhooks with a service like ntfy, brrr, or even Discord. Webhooks are just HTTP POST requests to whatever URL you want; you can configure one through the 'Webhook' dropdown (make sure to change the 'Event' to 'Print Completion'). You can use a plain text or JSON body with the following formatters: %file% for the name of the file that just finished and %printer% for the name of the printer.
There is also an HTTP status proxy that you can read more about at Remote Print HTTP Status Proxy.
And that's it 😅. If you happen to be interested in home PCB fabrication, also check out PCB Photolighography to learn how to use mslicer and a resin printer to improve the process.
In the 'Model' panel there are actions, properties, and some mesh statistics. Starting with the actions:
Tools › Collect Instances, that creates new collections grouping all instances of the same mesh.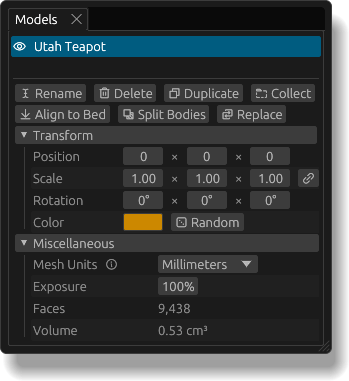
If you select multiple models at the same time by shift-clicking them in either the 3D view or the Model panel, the delete, collect, and duplicate actions will still be available.
The position and scale properties are specified in XYZ coordinates and the rotation in Euler angles: roll, pitch, yaw (applied in that order). The little link button next to scale lets you set nonuniform scales.
Because meshes stored as .stl or .obj files don't have unit metadata, mslicer just assumes they use millimeters, but not all tools output meshes in that format. If your mesh uses some other unit you can select one of the presets from the dropdown (millimeters, centimeters, meters, inches) or enter a custom conversion factor that multiplies the mesh units to get millimeters.
The exposure percent lets you set a lower exposure for individual models, which could be useful for exposure tests. In the case that two models with different exposure values overlap, the higher exposure will take precedence.
Faces is the number of triangles that make up the mesh, and volume is the volume of the mesh considering any scale factor you apply.
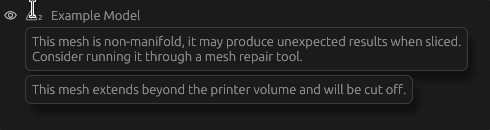
Mesh warnings appear as a small warning icon by the model name in the Models panel. There are currently two warnings.
You can set a global default slice config and reset to it at any point with the buttons at the top of the panel. Note that your slice config is saved to mslicer projects.
The 'Normal Layers' and 'First Layer' exposure configurations have the same properties:
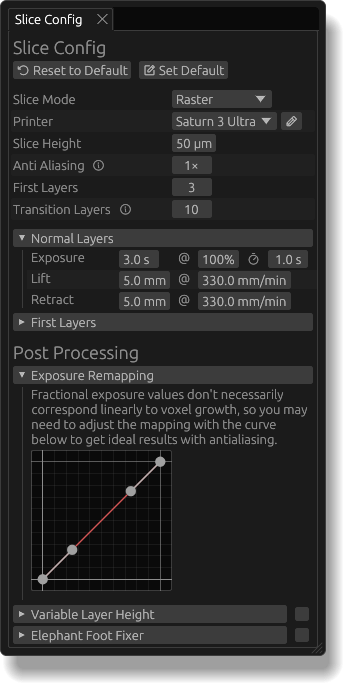
Exposure remapping lets you define a curve (using Bézier handles) that maps exposure values. This can be useful when using anti-aliasing since fractional exposure values don't necessarily correspond linearly to voxel growth.
There are also some additional postprocessors that I won't get into here: Variable Layer Height and the (legacy) Elephant Foot Fixer.
The quick layout tool (Tools › Quick Layout) runs a single pass of the layout algorithm, which works in simple cases, but it probably won't find an optimal layout with lots of models. For that reason there is also Tools > Advanced Layout, which runs multiple layout passes using different settings with simulated annealing.
With this tool, you set your parameters, click 'Start', and watch the model positions update until you are satisfied with the result; then you can click 'Stop' or just close the popup.
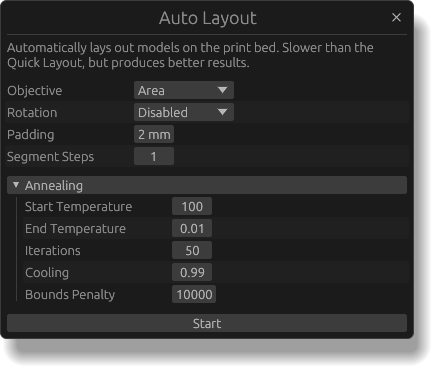
There is also a dropdown for the simulated annealing meta-parameters, but I won't go into them here. The defaults are usually fine.
If your printer is not one of the default presets, you can create your own! Feel free to also make a GitHub issue to get your printer config added to the default. Open the preset edit window with the pencil icon next to the printer setting in Slice Config.
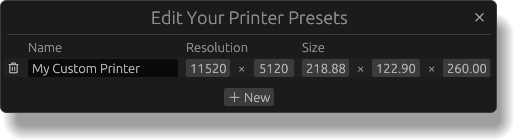
Here you can create new presets, delete them, change their names, and, of course, configure their build volume and resolution.
If you happen to have a sliced file and you want to convert it back to a mesh to re-slice or something, you're in luck! After loading a sliced file (or slicing something) you can press the 'Reconstruct Mesh' button in the Sliced panel, select a resolution (coarse, fine, or exact), and get the reconstructed mesh loaded into your project.
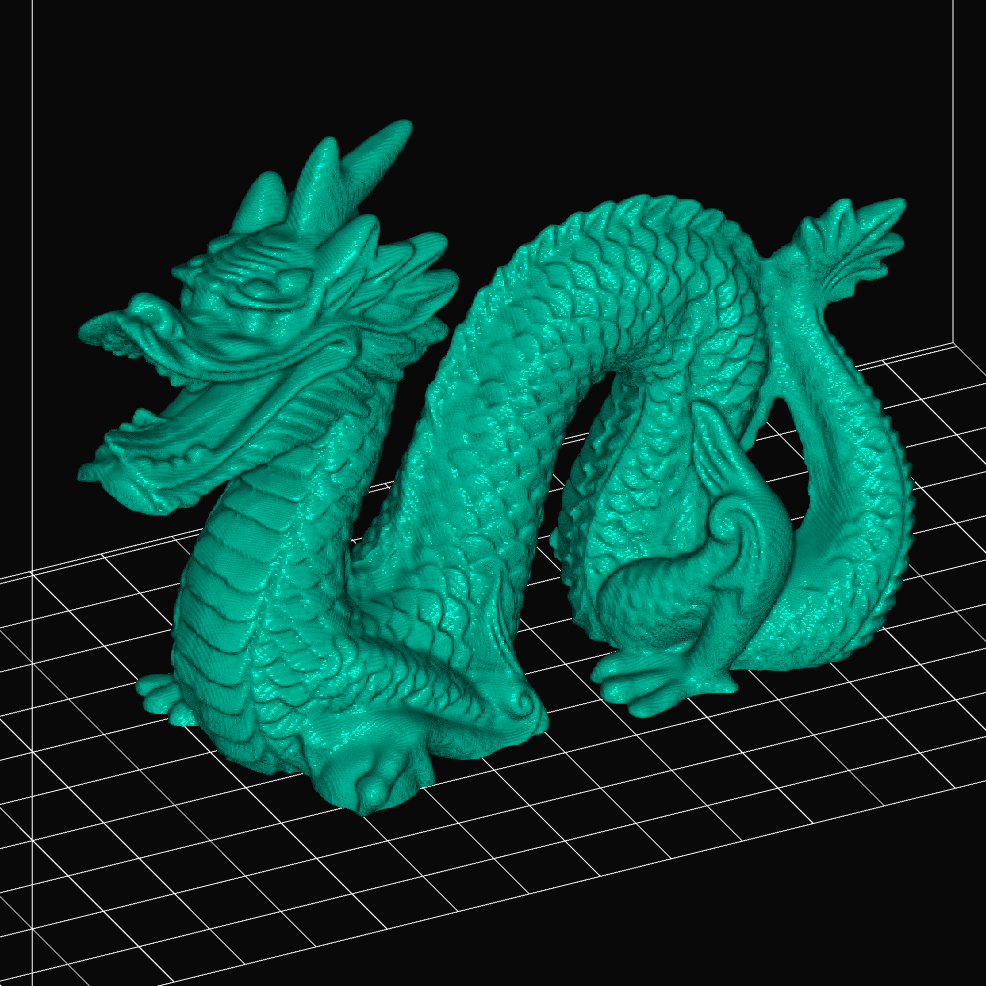
The image is the Stanford dragon recreated from a sliced file at coarse fidelity. It looks pretty good for being downsampled so much (20× at coarse), but you can see some artifacts, especially in areas with lower curvature. Do note that since every voxel can create multiple triangles in the reconstructed mesh, the poly count will be enormous even at lower fidelity. This example resulted in over 3.3M faces.
mslicer supports controlling the camera (and running some predefined shortcuts) with a 3Dconnexion device. This is currently only supported on Linux through the Spacenav library. To get it working, install the driver, start mslicer, and you should see 'Connected to Spacenav.' in the 'Spacenav' menu in the Workspace panel.
 mslicer